Note - you can select 720p in the video bar to make the text clearer.
Introduction
This exercise will focus on how to build an import solution involving a parent record with child records. We will be using an example worksheet that is used to create a purchase order. This process will be divided into four objectives:
- Adding The TSImport Function To The Purchase Order Header
- Adding The TSImport Function To The Purchase Order Detail
- Adding Conditions To Skip Items With $0.00 Amounts
- Importing The Data Into Job Cost Commitments
In this exercise we will be utilizing an Excel workbook named JCPurchaseOrder.xlsx. The workbook can be downloaded using the link below:
Download JCPurchaseOrder.xlsx
Also, since JCPurchaseOrder.xlsx utilizes Office Connector Query, please make sure you have access to either an evaluation or full license of Office Connector Query. If you need to obtain an evaluation license, please contact your Sage Business Partner or your Sage Customer Account Manager.
Note - This tutorial example is designed to work with the Timberline Construction Sample Data.Step 1 - Adding The TSImport Function To The Purchase Order Header
- Open the workbook JCPurchaseOrder.xlsx
- Once prompted, select the Timberline Construction Sample Data.
- Click cell H4, and in the Name Box enter:
ParentRecord - Click Import Wizard on the Office Connector toolbar.
- For Type Of Import, select JC Commitment Import File and click Next.
- For Type Of Data, a list of record types is displayed. Select Commitment and click Next.
- Select the column name check boxes listed below, and then click Next.
- √ Commitment
- √ CommitmentType
- √ Description
- √ APVendor
- √ Date
- √ CommitedToJC
- Under Values, click Link Selected Columns To Cells In My Worksheet and enter the related values as shown below:
- √ Commitment
= CommitmentId - CommitmentType
= 2- Note - Since the Commitment Type will always be Purchase Order (or 2), we will use a literal value instead of a cell reference.
- √ Description
= Description - √ APVendor
= VendorId - √ Date
= CommitmentDate - CommittedToJC
= 1- Note - Since the Commitment To JC is a True/False statement, we will use a literal value of 1 instead of a cell reference. 1=True, 0=False.
- √ Commitment
- Click Finish.
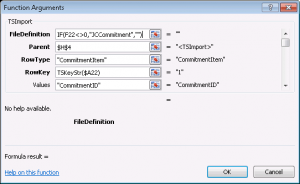
- The resulting formula in cell H4 should look like this:
=TSImport("JCCommitment","","Commitment",TSKeyStr(CommitmentID),"Commitment",CommitmentID,"CommitmentType","2","Description",Description,"APVendor",VendorID,"Date",CommitmentDate,"CommittedToJC","1")
- The resulting formula in cell H4 should look like this:

Step 2 - Adding The TSImport Function To The Purchase Order Detail
- Click cell h42 and click Import Wizard on the Office Connector toolbar.
- For Type Of Import, select JC Commitment Import File and click Next.
- For Parent Record, select ParentRecord and click Next.
- Note - The above step identifies the parent record import for JCCommitment and associates it with the child record import for JCCommitmentItem. The cell identified must contain the TSImport function for the parent record.
- For Columns, select the check box for each of the following columns and click Next.
- √ CommitmentID
- √ ItemNumber
- √ Description
- √ Job
- √ Extra
- √ CostCode
- √ Category
- √ Units
- √ UnitCost
- √ UnitDesc
- √ Amount
- For Values, select Link Selected Columns To Cells In My Worksheet and enter the related values as shown below:
- √ CommitmentID
= CommitmentId - √ ItemNumber
= $A22 - √ Description
= $B22 - √ Job
= JobId - √ Extra
= ExtraId - √ CostCode
= $G22 - Category
= M- Note - Since the Category will always be for Material in this example, we will use a literal value of "M" instead of a cell reference.
- √ Units
= $C22 - √ UnitCost
= $E22 - √ UnitDesc
= $D22 - √ Amount
= $F22 -
- √ CommitmentID
- Select Finish.
- The resulting formula in cell h42 should look like this:
=TSImport"JCCommitment",ParentRecord,"CommitmentItem",TSKeyStr($A22),"CommitmentID",CommitmentID,"ItemNumber",A22,"Description",$B22,"Job",JobID,"Extra",ExtraID,"CostCode",G22,"Category","M","Units",$C22,"UnitCost",$E22,"UnitDesc",$D22,"Amount",$F22)
- The resulting formula in cell h42 should look like this:

Step 3 - Adding Conditions To Skip Items With $0.00 Amounts
- To begin adding the condition, click cell h42 and click Insert Function on the formula bar.
- Update the FileDefinition argument from
"JCCommitment"toIF($F22<>0,"JCCommitment","")-
- Note - The first argument of the TSImport function identifies the type of file to be created. Leaving this argument blank causes Office Connector to automatically skip it. We’re using that concept here with an IF function so that if the amount is zero, a blank (“”) is used for the file type and the instruction is automatically skipped.
-
- Click OK.

Step 4 - Importing The Data Into Job Cost Commitments
- Enter the following sample values into the Purchase Order Header information.
- √ Purchase Order Number
= E1-0042 - √ Date
= 5/31/2011 - √ Description
= OC-Import Example - √ Vendor ID
= 205 - √ Job ID
= 03-001
- √ Purchase Order Number
- Enter the following sample values into the Purchase Order Detail Item 1.
- √ Description
= Concrete forms, 6" width - √ Units
= 20.0000 - √ UOM
= ea - √ Unit Cost
= 2.0000 - √ Cost Code
=3-110
- √ Description
- Enter the following sample values into the Purchase Order Detail Item 2.
- √ Description
= Reinforcing steel - √ Units
= 100.0000 - √ UOM
= lf - √ Unit Cost
= 1.75 - √ Cost Code
= 3-210
- √ Description
- Click Save Import File on the Office Connector Import toolbar.
- The default save location is sufficient for this example. If it is not already, the first action to be performed after the file has been created should be selected.
- Note - You can specify the location and name of the import file, and the next action to be taken after the file is created.
-
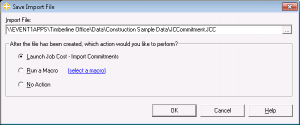
- Click OK to create the file and then launch Job Cost Import Commitments (it may take a few seconds for this window to come up).
- Once the Import Commitments – Print Selection window appears, click the […] ellipses button next to the Import File box, select the JCCommitment.JCC file, and click Open.
- Optionally – Click Printer Setup and change where the report will be sent.
- Click Start to import the data.
- Review the Job Cost Import Commitments report when the import has finished.

If you need help with this exercise, or have any questions, you may contact us at support.sage300cre-oc@event1software.com